In today’s tutorial, we will learn how to implement WebView in Kotlin Compose Multiplatform (KMP, KMM) for both Android & iOS platforms. We will cover a step-by-step guide to loading HTTP and HTTPS URLs in WebView, showing a progress indicator while loading.
WebView in Kotlin Compose Multiplatform (KMP, KMM):
In our previous article, we learned about Navigation in Compose Multiplatform. We will be using Navigation in our current tutorial. With the help of navigation, we will add two screens to our tutorial. The first screen is the Home Screen, and the Second is the WebView screen. On the Webview screen, we have added a Top bar where the URL will be shown loaded in the WebView. There is a catch. Currently, the KMP does not have its own WebView component when creating this tutorial. So we will use the Native WebView component for Android and the Native iOS WKWebView component.
1. Add Navigation in the KMP KMM App:
Please visit my Navigation in Compose Multiplatform article and add the required navigation dependency in your Compose Multiplatform project.
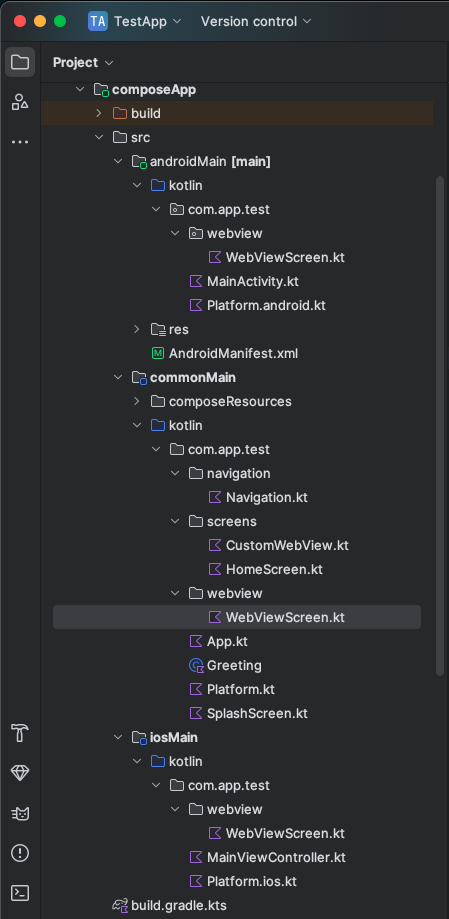
After setting up the navigation, we will follow the file structure below.
File structure:
- composeApp -> src -> androidMain -> kotlin -> package -> webview -> WebViewScreen.kt
- composeApp -> src -> iosMain -> kotlin -> package -> webview -> WebViewScreen.kt
- composeApp -> src -> commonMain -> kotlin -> package -> webview -> WebViewScreen.kt
- composeApp -> src -> commonMain -> kotlin -> package -> navigation -> Navigation.kt
- composeApp -> src -> commonMain -> kotlin -> package -> screens -> HomeScreen.kt
- composeApp -> src -> commonMain -> kotlin -> package -> screens -> CustomWebView.kt
- composeApp -> src -> commonMain -> kotlin -> package -> App.kt
We will be working mainly on seven files.
Start coding for the app:
1. Add Internet permission for Android:
To use WebView in Android, we must add Internet permission in composeApp -> src -> androidMain -> AndroidManifest.xml file.
|
1 2 |
<uses-permission android:name="android.permission.INTERNET"/> <uses-permission android:name="android.permission.ACCESS_NETWORK_STATE"/> |
Complete source code of my AndroidManifest.xml file after adding the above permission:
|
1 2 3 4 5 6 7 8 9 10 11 12 13 14 15 16 17 18 19 20 21 22 23 24 25 26 27 |
<?xml version="1.0" encoding="utf-8"?> <manifest xmlns:android="http://schemas.android.com/apk/res/android"> <uses-permission android:name="android.permission.INTERNET"/> <uses-permission android:name="android.permission.ACCESS_NETWORK_STATE"/> <application android:allowBackup="true" android:icon="@mipmap/ic_launcher" android:label="@string/app_name" android:roundIcon="@mipmap/ic_launcher_round" android:supportsRtl="true" android:theme="@android:style/Theme.Material.Light.NoActionBar" android:enableOnBackInvokedCallback="true"> <activity android:exported="true" android:configChanges="orientation|screenSize|screenLayout|keyboardHidden|mnc|colorMode|density|fontScale|fontWeightAdjustment|keyboard|layoutDirection|locale|mcc|navigation|smallestScreenSize|touchscreen|uiMode" android:name=".MainActivity"> <intent-filter> <action android:name="android.intent.action.MAIN" /> <category android:name="android.intent.category.LAUNCHER" /> </intent-filter> </activity> </application> </manifest> |
2. Add Internet permission for iOS:
We must also add internet permission for iOS in App -> iosApp -> iosApp -> Info.plist file.
|
1 2 3 4 5 6 7 8 9 10 11 12 13 14 |
<!-- Add the following network-related permissions --> <key>NSAppTransportSecurity</key> <dict> <key>NSAllowsArbitraryLoads</key> <true/> <!-- Allow all HTTP requests (use cautiously, avoid in production) --> <key>NSExceptionDomains</key> <dict> <key>example.com</key> <!-- Replace with your actual domain --> <dict> <key>NSExceptionAllowsInsecureHTTPLoads</key> <true/> <!-- Allow HTTP for this domain --> </dict> </dict> </dict> |
Complete source code of my Info.plist file after adding the above permission:
|
1 2 3 4 5 6 7 8 9 10 11 12 13 14 15 16 17 18 19 20 21 22 23 24 25 26 27 28 29 30 31 32 33 34 35 36 37 38 39 40 41 42 43 44 45 46 47 48 49 50 51 52 53 54 55 56 57 58 59 60 61 62 63 64 65 66 |
<?xml version="1.0" encoding="UTF-8"?> <!DOCTYPE plist PUBLIC "-//Apple//DTD PLIST 1.0//EN" "http://www.apple.com/DTDs/PropertyList-1.0.dtd"> <plist version="1.0"> <dict> <key>CFBundleDevelopmentRegion</key> <string>$(DEVELOPMENT_LANGUAGE)</string> <key>CFBundleExecutable</key> <string>$(EXECUTABLE_NAME)</string> <key>CFBundleIdentifier</key> <string>$(PRODUCT_BUNDLE_IDENTIFIER)</string> <key>CFBundleInfoDictionaryVersion</key> <string>6.0</string> <key>CFBundleName</key> <string>$(PRODUCT_NAME)</string> <key>CFBundlePackageType</key> <string>$(PRODUCT_BUNDLE_PACKAGE_TYPE)</string> <key>CFBundleShortVersionString</key> <string>1.0</string> <key>CFBundleVersion</key> <string>1</string> <key>LSRequiresIPhoneOS</key> <true/> <key>CADisableMinimumFrameDurationOnPhone</key> <true/> <key>UIApplicationSceneManifest</key> <dict> <key>UIApplicationSupportsMultipleScenes</key> <false/> </dict> <key>UILaunchScreen</key> <dict/> <key>UIRequiredDeviceCapabilities</key> <array> <string>armv7</string> </array> <key>UISupportedInterfaceOrientations</key> <array> <string>UIInterfaceOrientationPortrait</string> <string>UIInterfaceOrientationLandscapeLeft</string> <string>UIInterfaceOrientationLandscapeRight</string> </array> <key>UISupportedInterfaceOrientations~ipad</key> <array> <string>UIInterfaceOrientationPortrait</string> <string>UIInterfaceOrientationPortraitUpsideDown</string> <string>UIInterfaceOrientationLandscapeLeft</string> <string>UIInterfaceOrientationLandscapeRight</string> </array> <!-- Add the following network-related permissions --> <key>NSAppTransportSecurity</key> <dict> <key>NSAllowsArbitraryLoads</key> <true/> <!-- Allow all HTTP requests (use cautiously, avoid in production) --> <key>NSExceptionDomains</key> <dict> <key>example.com</key> <!-- Replace with your actual domain --> <dict> <key>NSExceptionAllowsInsecureHTTPLoads</key> <true/> <!-- Allow HTTP for this domain --> </dict> </dict> </dict> </dict> </plist> |
3. Creating a common WebViewScreen composable:
Create a composable file in composeApp -> src -> commonMain -> kotlin -> package -> webview -> WebViewScreen.kt .
|
1 2 3 4 5 6 7 8 9 10 11 12 13 |
package com.app.test.webview import androidx.compose.runtime.Composable import androidx.compose.ui.Modifier import androidx.navigation.NavController @Composable expect fun WebViewScreen( navController: NavController, url: String, modifier: Modifier = Modifier, enableJavaScript: Boolean = true ) |
Code explanation:
- navController: To access the Navigation.
- url: The webpage URL to load.
- modifier: To apply size, padding, or other UI changes.
- enableJavaScript: Whether JavaScript should be enabled or not.
4. Implement Android native WebView:
Creating a file in composeApp -> src -> androidMain -> kotlin -> package -> webview -> WebViewScreen.kt .
|
1 2 3 4 5 6 7 8 9 10 11 12 13 14 15 16 17 18 19 20 21 22 23 24 25 26 27 28 29 30 31 32 33 34 35 36 37 38 39 40 41 42 43 44 45 46 47 48 49 50 51 52 53 54 55 56 57 58 59 60 61 62 63 64 65 66 67 68 69 70 71 72 73 74 75 76 77 78 79 80 81 82 83 84 85 86 87 88 89 90 91 |
package com.app.test.webview import android.graphics.Bitmap import android.webkit.WebView import android.webkit.WebViewClient import androidx.compose.foundation.layout.* import androidx.compose.material.CircularProgressIndicator import androidx.compose.material.Icon import androidx.compose.material.IconButton import androidx.compose.material.MaterialTheme import androidx.compose.material.Text import androidx.compose.material.TopAppBar import androidx.compose.material.icons.Icons import androidx.compose.material.icons.filled.Close import androidx.compose.runtime.* import androidx.compose.ui.Modifier import androidx.compose.ui.viewinterop.AndroidView import androidx.compose.ui.unit.dp import androidx.compose.ui.Alignment import androidx.navigation.NavController @Composable actual fun WebViewScreen( navController: NavController, url: String, modifier: Modifier, enableJavaScript: Boolean, ) { var isLoading by remember { mutableStateOf(true) } Column(modifier = modifier.fillMaxSize()) { TopAppBar( title = { Text( text = url, maxLines = 1, style = MaterialTheme.typography.h5 ) }, actions = { IconButton(onClick = { navController.popBackStack() }) { Icon( imageVector = Icons.Default.Close, contentDescription = "Close WebView" ) } }, modifier = Modifier .fillMaxWidth() .height(56.dp) ) Box(modifier = Modifier.fillMaxSize()) { AndroidView( factory = { context -> WebView(context).apply { settings.javaScriptEnabled = enableJavaScript webViewClient = object : WebViewClient() { override fun onPageStarted( view: WebView?, url: String?, favicon: Bitmap? ) { super.onPageStarted(view, url, favicon) isLoading = true } override fun onPageFinished(view: WebView?, url: String?) { super.onPageFinished(view, url) isLoading = false } } loadUrl(url) } }, modifier = Modifier.fillMaxSize() ) // Loader if (isLoading) { Box( modifier = Modifier .fillMaxSize(), contentAlignment = Alignment.Center ) { CircularProgressIndicator() } } } } } |
Code explanation:
- isLoading is a state variable used to track the loading state of WebView.
- TopAppBar shows the URL as the title.
- An IconButton with a close (X) icon calls navController.popBackStack() to go back.
- WebView.settings.javaScriptEnabled enables or disables JavaScript based on the passed parameter.
- onPageStarted sets isLoading to true.
- onPageFinished sets isLoading to false.
- loadUrl(url) loads the specified web page.
- A CircularProgressIndicator shows while loading the WebView.
5. Implement iOS native WebView:
Creating a file in composeApp -> src -> iosMain -> kotlin -> package -> webview -> WebViewScreen.kt
|
1 2 3 4 5 6 7 8 9 10 11 12 13 14 15 16 17 18 19 20 21 22 23 24 25 26 27 28 29 30 31 32 33 34 35 36 37 38 39 40 41 42 43 44 45 46 47 48 49 50 51 52 53 54 55 56 57 58 59 60 61 62 63 64 65 66 67 68 69 70 71 72 73 74 75 76 77 78 79 80 81 82 83 84 85 86 87 88 89 90 91 92 93 94 95 96 |
package com.app.test.webview import androidx.compose.foundation.layout.* import androidx.compose.material.CircularProgressIndicator import androidx.compose.material.Icon import androidx.compose.material.IconButton import androidx.compose.material.MaterialTheme import androidx.compose.material.Text import androidx.compose.material.TopAppBar import androidx.compose.material.icons.Icons import androidx.compose.material.icons.filled.Close import androidx.compose.runtime.* import androidx.compose.ui.Modifier import androidx.compose.ui.interop.UIKitView import androidx.compose.ui.unit.dp import androidx.compose.ui.Alignment import androidx.compose.ui.unit.sp import androidx.navigation.NavController // Important! import kotlinx.cinterop.ExperimentalForeignApi import kotlinx.cinterop.ObjCSignatureOverride import kotlinx.cinterop.readValue import platform.CoreGraphics.CGRectZero import platform.Foundation.NSURL import platform.Foundation.NSURLRequest import platform.WebKit.* import platform.darwin.NSObject @OptIn(ExperimentalForeignApi::class) @Composable actual fun WebViewScreen( navController: NavController, url: String, modifier: Modifier, enableJavaScript: Boolean ) { var isLoading by remember { mutableStateOf(true) } Column(modifier = modifier.fillMaxSize()) { TopAppBar( title = { Text( text = url, maxLines = 1, fontSize = 16.sp, style = MaterialTheme.typography.h5 ) }, actions = { IconButton(onClick = { navController.popBackStack() }) { Icon( imageVector = Icons.Default.Close, contentDescription = "Close WebView" ) } }, modifier = Modifier .fillMaxWidth() .height(56.dp) ) Box(modifier = Modifier.fillMaxSize()) { UIKitView( factory = { val config = WKWebViewConfiguration().apply { preferences.javaScriptEnabled = enableJavaScript } WKWebView(frame = CGRectZero.readValue(), configuration = config).apply { navigationDelegate = object : NSObject(), WKNavigationDelegateProtocol { @ObjCSignatureOverride override fun webView(webView: WKWebView, didStartProvisionalNavigation: WKNavigation?) { isLoading = true } @ObjCSignatureOverride override fun webView(webView: WKWebView, didFinishNavigation: WKNavigation?) { isLoading = false } } loadRequest(NSURLRequest(NSURL(string = url))) } }, modifier = Modifier.fillMaxSize() ) if (isLoading) { Box( modifier = Modifier.fillMaxSize(), contentAlignment = Alignment.Center ) { CircularProgressIndicator() } } } } } |
Code explanation:
- TopAppBar is used to show the page URL as the title.
- UIKitView embeds a native iOS WKWebView into the Compose UI.
- WKWebViewConfiguration is configured to enable or disable JavaScript based on the enableJavaScript parameter.
6. Creating Navigation:
Creating a file in composeApp -> src -> commonMain -> kotlin -> package -> navigation -> Navigation.kt .
|
1 2 3 4 5 6 7 8 9 10 11 12 13 14 15 16 17 18 19 20 21 22 23 24 25 |
package com.app.test.navigation import androidx.compose.runtime.Composable import androidx.navigation.compose.NavHost import androidx.navigation.compose.composable import androidx.navigation.compose.rememberNavController import com.app.test.screens.CustomWebView import com.app.test.screens.HomeScreen @Composable fun AppNavigation() { val navController = rememberNavController() NavHost( navController = navController, startDestination = "home_screen", ) { composable("home_screen") { HomeScreen(navController) } composable("custom_webview") { CustomWebView(navController) } } } |
7. Creating Home Screen:
Creating a file in composeApp -> src -> commonMain -> kotlin -> package -> screens -> HomeScreen.kt .
|
1 2 3 4 5 6 7 8 9 10 11 12 13 14 15 16 17 18 19 20 21 22 23 24 25 26 27 28 29 30 31 32 33 34 35 36 |
package com.app.test.screens import androidx.compose.foundation.layout.* import androidx.compose.material.* import androidx.compose.runtime.Composable import androidx.compose.ui.Alignment import androidx.compose.ui.Modifier import androidx.compose.ui.graphics.Color import androidx.compose.ui.text.style.TextAlign import androidx.compose.ui.unit.dp import androidx.navigation.NavHostController @Composable fun HomeScreen(navController: NavHostController) { Column( modifier = Modifier .padding(12.dp) .fillMaxWidth(), horizontalAlignment = Alignment.CenterHorizontally ) { Text( text = "Home Screen", style = MaterialTheme.typography.h4, color = Color.Black, textAlign = TextAlign.Center ) Spacer(modifier = Modifier.height(40.dp)) Button( onClick = { navController.navigate("custom_webview") } ) { Text("Open WebView Screen") } } } |
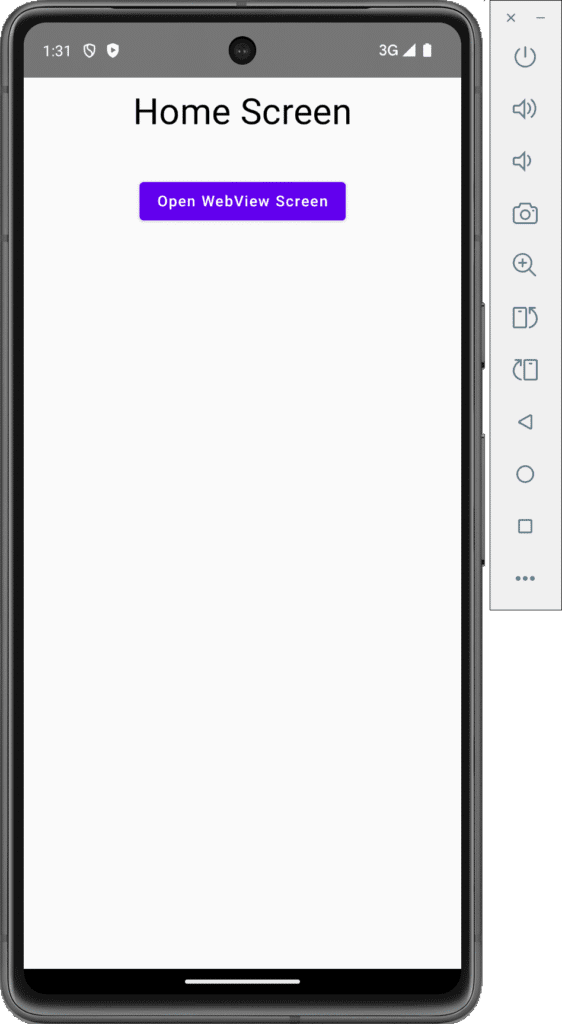
Screenshot of Home screen:
8. Creating Custom WebView Screen:
Creating a file in composeApp -> src -> commonMain -> kotlin -> package -> screens -> CustomWebView.kt .
|
1 2 3 4 5 6 7 8 9 10 11 12 13 14 15 16 17 |
package com.app.test.screens import androidx.compose.foundation.layout.* import androidx.compose.runtime.Composable import androidx.compose.ui.Modifier import androidx.navigation.NavHostController import com.app.test.webview.WebViewScreen @Composable fun CustomWebView(navController: NavHostController) { WebViewScreen( navController , url = "https://google.com", modifier = Modifier.fillMaxSize(), enableJavaScript = true ) } |
9. Creating App.kt file:
|
1 2 3 4 5 6 7 8 9 10 11 12 |
package com.app.test import androidx.compose.material.MaterialTheme import androidx.compose.runtime.Composable import com.app.test.navigation.AppNavigation @Composable fun App() { MaterialTheme { AppNavigation() } } |
Screenshot on an Android device:
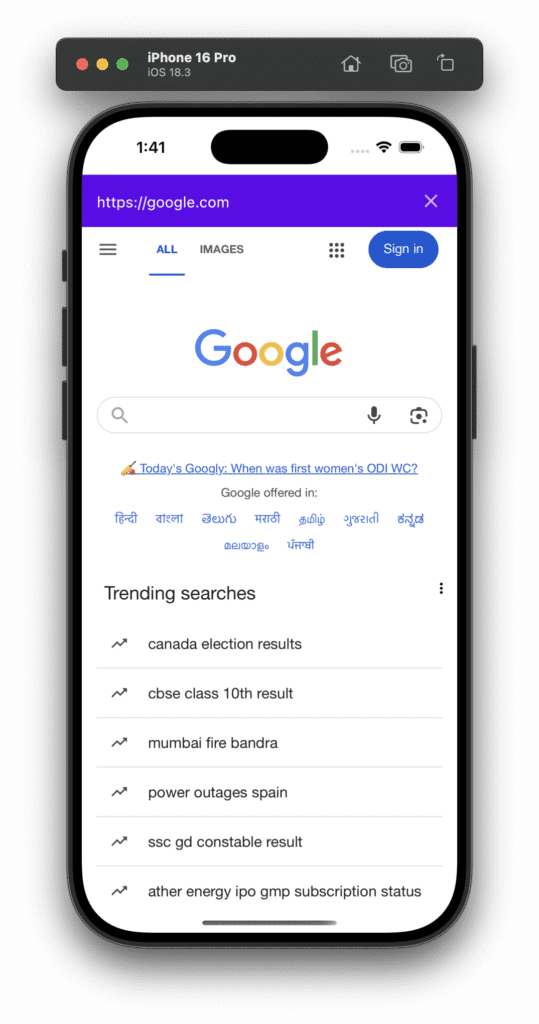
Screenshot is on an iOS device:
Happy coding.




It really Helped me,thanks buddy…
Welcome bro.